Docker basics: stateless container using docker volume


When we run a container, it has its own file system. Like C: drive in windows or /root in Linux. All of these file systems comes from our image. We can run multiple containers using the same image, but each of those containers will have their own file system.
To prove that each docker container have their own file system, even though the come from the same image, let's build a simple program. A program where we'll put a random number on a TXT file inside each container.
First, let's build the Dockerfile:
FROM alpine:3.9
WORKDIR /random
COPY random.sh .
RUN chmod +x random.sh
CMD ./random.sh
And let's build the program the random.sh to run our program:
#!/bin/sh

echo $RANDOM > number.txt
Let's not delve too deep for this program. Our Dockerfile is simply using Linux as our base image. Create directory /random and make it as our working directory. Copy random.sh to our working directory. Make our random.sh executable, and set command to run the program.
After this, all we have to do is creating the image using this command:
docker build -t random-generator .
After building the image, we just have to execute it using this command:
docker run --name random1 random-generator
Let's make two containers using our random-generator image. So run the command above once again:
docker run --name random2 random-generator
if your run docker container ls it should not list two containers that we just created. Because the container status is already exit. Different from the usual web service image, this image will just generate random generator to our TXT file and exit the process. So, in order to see our two containers image, please use the command docker container ls --all. It should show our containers with the status exit.
After we had run our container, we should copy the random number generated inside the container to our host machine. Please use both of this command:
docker container cp random1:/random/number.txt number1.txt
docker container cp random2:/random/number.txt number2.txt
After we copy both of the TXT files from our container to our host machine, now we can show the number using this command:
cat number1.txt && cat number2.txt
Now you'll see that we're showing two different numbers here. What we can learn here is, that even though both of those containers use the exact same image, both of those containers write a random number to their own file system. Same image, different file system.
We can also see that we're copying the TXT file from the containers using cp* command, even though the containers already stopped. This also means that, file system continue to exist whether the container is running or exit/stop.
Let's focus on this diagram here that I get from here for a second:
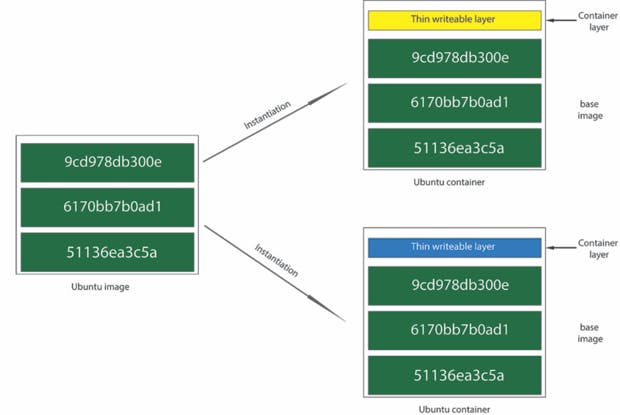
The reason why each docker container have their own file system even though the came from the same image is because the container file system built up from different sources. So we know that when we start an application in a container, docker will build the environment, virtual IP, and lastly the virtual file system.
The file system starts from the container image. So in this case, our random-number start from the base image layer and the writable layer. So every time we write data inside a container, it lives in its own writable layer. This is why random1 container and random2 container could write to the same file in their own file systems and have different content. Because they're actually separate file systems in those writable layers. So they share the same base image, but on the top of that, they each have their own independent writable layer.
But the problem here is because each file system lives in each container. So when we remove a container, we will also remove the writable layer too. So any data that was written inside the container will no longer exist.
We've learned here that image layers are shared between images and containers. And for them to be shared, they have to be read-only. So when we edit a file inside a container, it doesn't really edit the image. So when we start a container from an image and edit a file, and start another container from the exact same image, it will start off with the original image contents and not the changed contents.
When we edit a file from one of the image layers. Docker has these copy-on-write process. Which means it copies the file from the image layer up to the writable layer and overwrites the inside the writable layer and also hide the file that inside the image layers. This is why when a container starts from the same image, it will have the original content and not the overwrite file.
Using the docker volume for data persistence
The container filesystem has the same lifecycle as the container. So in order to persist the container data even after the container has been removed, we have to separate the data lifecycle from the container lifecycle, in this case, we're going to use docker volume.
You can think docker volume as a USB, you can stick it to container. So why use docker volume ? so that even after we remove the container, the volume will still exist. And when the new container start, we can use the docker volume and it will still show the data.
Let's start to create docker volume inside our Dockerfile. You can use volume inside Dockerfile by using the VOLUME instruction. We won't be creating any app or program because it will take time. So you can put it in your Dockerfile like this:
...

VOLUME /data

...
Whenever you put that instruction inside the Dockerfile and you build the image. What docker will do is basically creating a new volume named /data and attach it to the container. Inside our container, there'll be a new directory called /data. But the data is actually stored in volume. So it may live even after we remove the container.
In order to inspect a volume that attached to a container, we can use this command:
docker container inspect --format '{{.Mounts}}' ourcontainer
That command will return the volume ID, physical source of the volume of the host, and the target directory inside the container.
You can also see the list of docker volumes inside your host machine by using the command:
docker volume ls
Docker volume are a first-class citizen. So you can use docker volume the same as docker container or image. You can create, list, inspect, or remove docker volume.
But the volume that created from the Dockerfile are created as a separate volume for each container. So if we start a new container, it will create a new volume for that container, so that container will have an empty volume.
What if we want to share data or share volume between containers ? We can attach volume to a container using this command:
docker container run -d --name app --volumes-from other-container our-image
As we can see, the command above is a command to run a new container from an image. But the difference here is, there's a new flag --volumes-from in our command. What does it do ? that flag will attach a volume from other container to the container that we're going to run.
And if we want to manage the volume ourselves, we can do it too. By creating a new volume outside container or Dockerfile we can create a volume that is exclusive to one container. Start by using this command:
docker volume create app-volume
And to attach a container to that volume that we've just created, we can use this command:
docker container run -d -p 8000:80 -v app-volume:/data --name container-name
We can see that the command above is a command to run a container from an image. The difference here is that there's -v flag in it. After that flag, we'll specify the volume name that we've just created and the target directory, separated by a colon.
With this, we've clarified that the volume has its own lifecycle. Because it already exists even before the container are created and it will still remain after the container been removed. You can prove it by removing our container and listing our volume again.
There's one thing we have to understand about docker volume. The VOLUME instruction inside our Dockerfile and the -v flag that we use to run a container are two separate features. We don't have to choose between one of them, we can even use both of them at the same time.
The image that built using VOLUME instruction inside its Dockerfile would always create a new volume for the container if there's no volume specified in the run command.
The volume flags mount a volume to a container, whether the image has a volume specified or not. If the image has a volume, then the volume flag can override the column so a new volume won't be created.
If we're creating an image for other people to use, let's put the VOLUME instruction inside the Dockerfile. It will tackle just in case the user doesn't specify the volume by using the volume flag. But if we're using another image, it's better not to rely on the default volume and works with named volume that we create ourselves.