Docker basics: optimizing Dockerfile by using docker image layer cache


Introduction
In the previous blog post, we've seen how simple it is to create a Dockerfile to produce a docker image. But now, let's see how we can optimize it by using image layers cache and increase image creation speed by leaps and bounds.
Preparing the app
Let's start by creating a simple app using node.js. Let's start by creating a web logging app, which will only make a log with a name on the console with some intervals.
I decided to choose the simplest app I can imagine. Because I don't want to make this tutorial into some node.js tutorial, and I think that many of you aren't even a node.js developers. We'll focus on some concept of the docker rather than the language or framework itself because docker works across many languages and frameworks.
So, you just have to create a new directory with our source code in it. Inside the new directory, please create a file named app.js. And paste this code inside your app.js file:
setInterval(() => {
    console.log(`hello, ${process.env.NAME}`)
}, process.env.INTERVAL);
From the source code, we can see that our program is only 3 lines in length. With a node.js built-in function setInterval and inside it is also a built-in node.js console.log function to just log a string "hello, {people name}". We'll get the name using environment variable. For example, if our name environment variable is "PHILIP", then our program will log "hello, PHILIP". We also get the interval using the interval environment variable. By the way, the interval must be in milliseconds. All the function is using built-in node.js function, so we don't even need to install any package.
Just save the file and with this our simple app is finished and we can focus on creating the Dockerfile.
Creating the Dockerfile
Now, let's create an empty Dockerfile in our directory.
Inside the Dockerfile, we'll write all the instruction in order to run our app. So let's just paste this script inside the Dockerfile:
FROM node:alpine3.10

ENV INTERVAL="3000"
ENV NAME="PHILIP"

WORKDIR /node-log

COPY app.js .

CMD ["node", "/node-log/app.js"]
As you can see, we still using the node:alphine3.10 (node.js version 15.7.0) for our base image. Which will give us all the node.js functionality that our program need.
We also set 2 environment variables using the ENV command. The first environment variable is the interval time (in milliseconds, in this case means 3 seconds) and the second environment variable is the name (in this case is PHILIP, which is my name).
We also create "node-log" directory inside our image container, set it as our working directory, and copy app.js to the "node-log" directory. Lastly, we set the app run command as "node /node-log/app.js", which would track our app.js inside "node-log" directory.
So, we can build the docker image using this command:
docker build -t node-log:v1 .
You can run the command from your terminal/command prompt from inside the app directory. And this command will generate our docker image, which we tagged as "v1" that means "version 1".
After you run the docker build command, you can check the image using the command:
docker image ls
The image should be there, and the tag should be "v1".
After this, you can run the image using the command
docker container run node-log:v1
If successful, it should return the container ID. With this, our simple program is running using docker image we've built. So, let's analyze the image a bit.
Understanding the docker image and docker image layers
We won't be diving to deep inside the docker systems, as this is just a basic tutorial about docker. But it is very important to understand the docker image and docker image layers in order to optimize the docker image creation time.
If check all of your docker images using this command:
docker images node-log
It should be giving you all the image with the repository name of "node-log", and if you're following this tutorial, it should be giving only 1 image with that repository name like this picture below:

On your terminal, you can see some of the image basic info like the image tag and size, and we'll focus on those two.
As you can see, the image size is 109MB. It's the size that we need to run our program. For a simple program like this, you might think that it's a big size no matter where you see it. But the truth is, our program size is not even touched 1MB. So why the command is saying that our image is as big as 109MB ? In order to understand that, let's run this command on our terminal:
docker image history node-log:v1
And you may see a list of output like this:
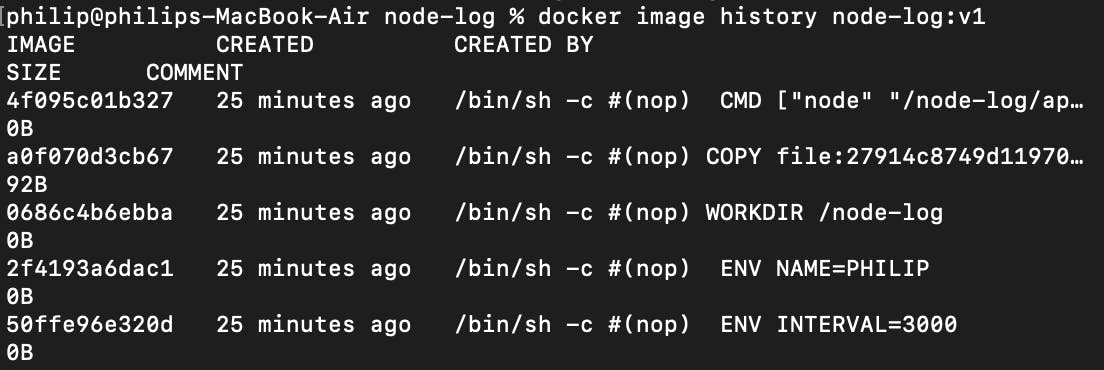
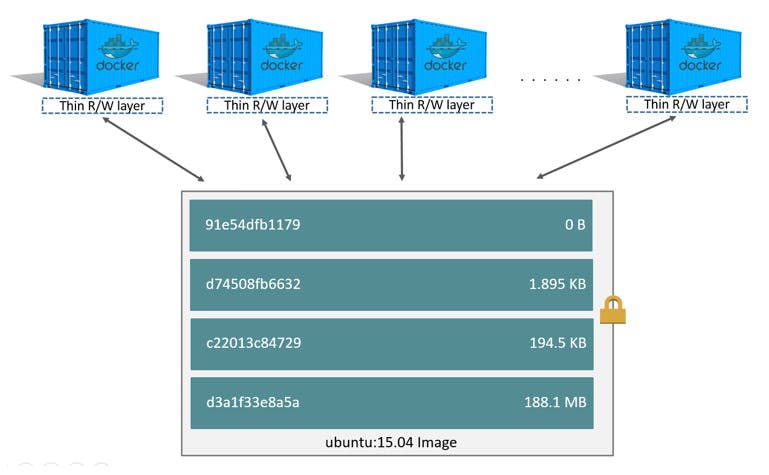
You have to know that each line of instruction in our Dockerfile file is creating an image layer. So what does this means ? it means that our docker image is just a collection of layers. And every layer is saved by docker inside the docker engine cache. And what's the most important thing about these layers ? it is the fact that every layers can be shared between different images and containers. And if you have many containers that uses node.js runtime, all those containers may share the same image layers that contains the node.js runtime. Like the picture below that I took from the docker docs :
For the sake of experimenting in order to understand this better, let's create another image using the same docker file. Just this time we'll be using tag "v2" as our image tag using this command:
docker build -t node-log:v2 .
It should be successful. After that let's check our docker image list again using this command:
docker images node-log
Now, you should see that you have 2 image with repository name "node-log", but with 2 different tags like this:

Using basic math, if we calculate those two docker images, then we'll know that each image take around 109MB space each. It means that, 109 * 2 = 218MB for just 2 docker images. But the reality is different. The reality is, each of those docker image is sharing one image layers. Just to check it out, let's run this command on our terminal:
docker system df
It should be giving you some output, but let's focus on the images type like this picture below:

The weird thing is, our total image size is 109.2MB, different from what we expect 218MB from before. So what does this means ? this means that each of our "node-log" image is sharing image layers. The reality is, each of our image is only take up around 1KB space. The 109MB come from node image (you can check node image size using "docker image ls" command).
So when you list all of your docker images, and you see the image size you already know that doesn't represent the "real" size of the image. It only shows the logical size of an image assuming that you don't have any other image on your system. And if you have images that shares the same layers, the disk space that docker use is much smaller.
Optimizing the Dockerfile using the image layer cache
And we've come to the most important part of this tutorial, that is optimizing the Dockerfile using the image layer cache. This is the reason that we've delved a bit into the docker image layer in the previous part.
As we've come to understand up to this point, that docker image is logically just one image, but physically it composes of many layers. So, every time we create an image, it basically creating a layer from each line of instruction that we write in our Dockerfile. So what does this means ? this means that, if we create an image from the exact same instruction and content, docker will use the layers that are cached in the docker system. Why would docker do this ? it's basically for saving the execution time and avoid the duplication of layers.
Basically, if we're creating an image using the exact same instruction (dockerfile) but different content (what i mean content here is our app.js), docker will check if the content if match in the cache by generating a hash. The hash is made from the Dockerfile instruction and the contents of any files being copied. And of there's no match for the hash in the existing image layers, docker will execute the instruction and the instruction that follows, basically, it'll break the cache. When the cache break, docker will assume that all the following instruction after that also change, so docker will also execute it.
It may be quite a bit hard to understand. So, let's create another image using our program. But before that, we have to change our app.js, so we can see the different step that docker use. So, let's just add a new line in our app.js and save it. After that we're going to create a new image with this command:
docker image build -t node-build:v3 .
We're creating an image with the same repository but with a different tag, this time we'll tag it with "v3" which means version 3. After running the command, you'll be able to see some output like this picture :
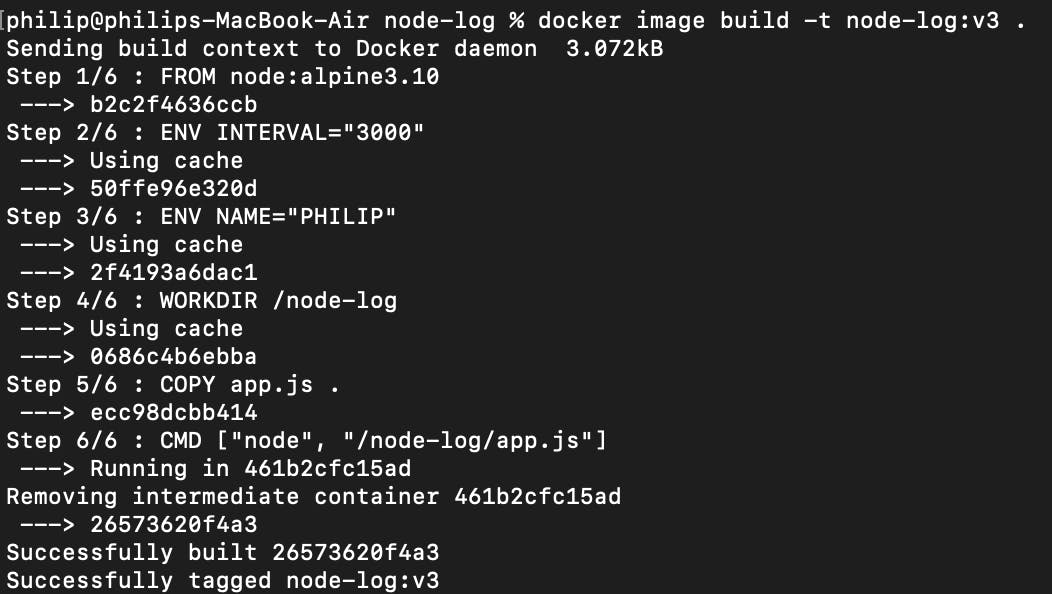
You'll see that step 1-4 is using cache just for the fact that there's "Using cache" description below it. But when we see step 5 and 6, we won't be able to see it. That's because the code in our app.js had changed. So when docker realize that, docker will execute that step and the step afterwards.
So that's how docker layer and caching works. From the example above, we don't have to run step 1-4, because it's redundant and wasting time. Why would docker run step 1-4 when there's no difference ? docker just use the previous build layers and save the execution time.
But when there's a change in our app.js in step 5, just will detect it and re-execute it, and also the instruction afterwards, it means that step 6 also will be re-executed. Isn't that also redundant ? let's say that there are 3 more steps after step 5, does it means that we'll re-execute the next 3 steps just because there's a change in step 5 ? How do we tackle it ?
In order to avoid any redundant instruction execution, we just have to ordered the instruction (our Dockerfile) by how often they change. The instruction that are unlikely to change to the start of the Dockerfile and the instruction that likely to change at the end. The goal here is to avoid re-execution and using docker cache system for everything else. So let's do that by changing our Dockerfile like this:
FROM node:alpine3.10

CMD ["node", "/node-log/app.js"]

WORKDIR /node-log

ENV INTERVAL="3000"
ENV NAME="PHILIP"

COPY app.js .
After this, let's re-create our docker image using this command:
docker image build -t node-log:v4 .
We can see that the command will re-execute all the instruction in docker file without using cache this time. That's because we're changing our Dockerfile.
We also see that the CMD command is moved to the second execution. That's because that command will unlikely to change. Followed by WORKDIR command and ENV command. At the last execution part, we have the COPY command. That's because the COPY command will likely to change and be re-executed. Because our main app file will likely to be changed than any other file or instruction, that's why we put it to the last.
But hold on, we do realize that each instruction will create a layer right ? so let's say that those two ENV command will create 2 layers. But why would we create 2 layers when we can just create 1 layer. The fact is, 1 ENV command can be used to to set multiple environment variable. So let's do that by changing our Dockerfile again into this:
FROM node:alpine3.10

CMD ["node", "/node-log/app.js"]

WORKDIR /node-log

ENV INTERVAL="3000" \
        NAME="PHILIP"

COPY app.js .
As we can see, we are using only one ENV command to set multiple environment variables. Now, let's create new image using this command:
docker image build -t node-log:v5 .
This time, we'll see that docker is using cache for around 3 steps until step 4 that docker re-execute the instruction. That's because we're changing the fourth instruction that use ENV command, so the instruction afterwards also gets re-executed.
Conclusion
That's all for optimizing the Dockerfile using the docker image layers. Many things left unclear here, but for the basic and crucial parts, at least are covered here.